Hacer Diagrama De Gantt En Excel 2013
This article provides you with the best Gantt chart template to use for all your project needs. Learn how to use a Gantt chart template in Excel versions 2000 and up, and how to customize the template for your project.
How would you like to create your Gantt Chart?
Use a pre-built gantt chart template in Smartsheet
Time to complete: 3 minutes
- or -
Manually create a gantt chart template in Excel
Time to complete: 30 minutes
Smartsheet
How to Create a Gantt Chart in Excel Using a Template
Download Gantt Chart Excel Template
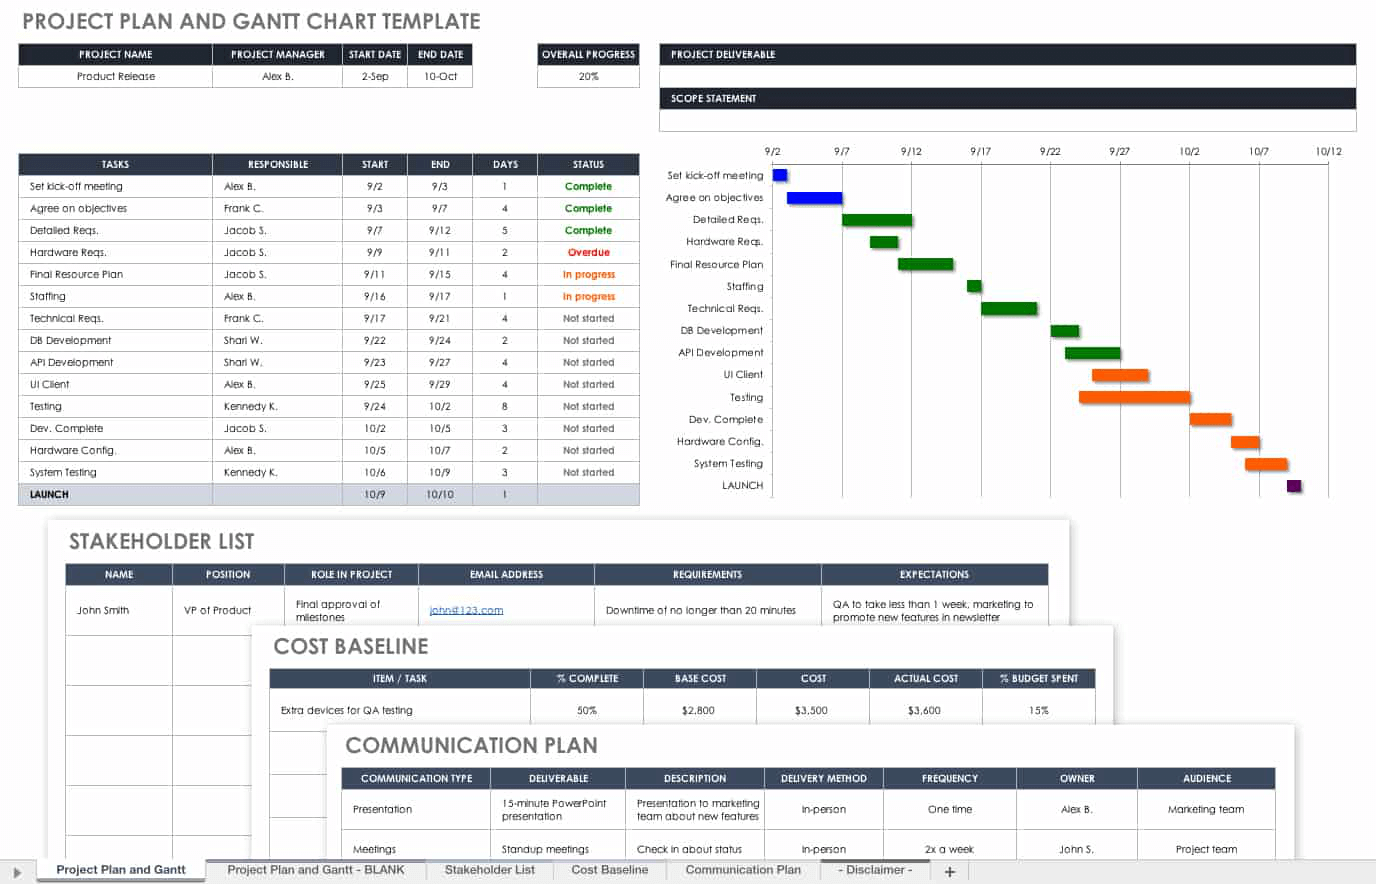
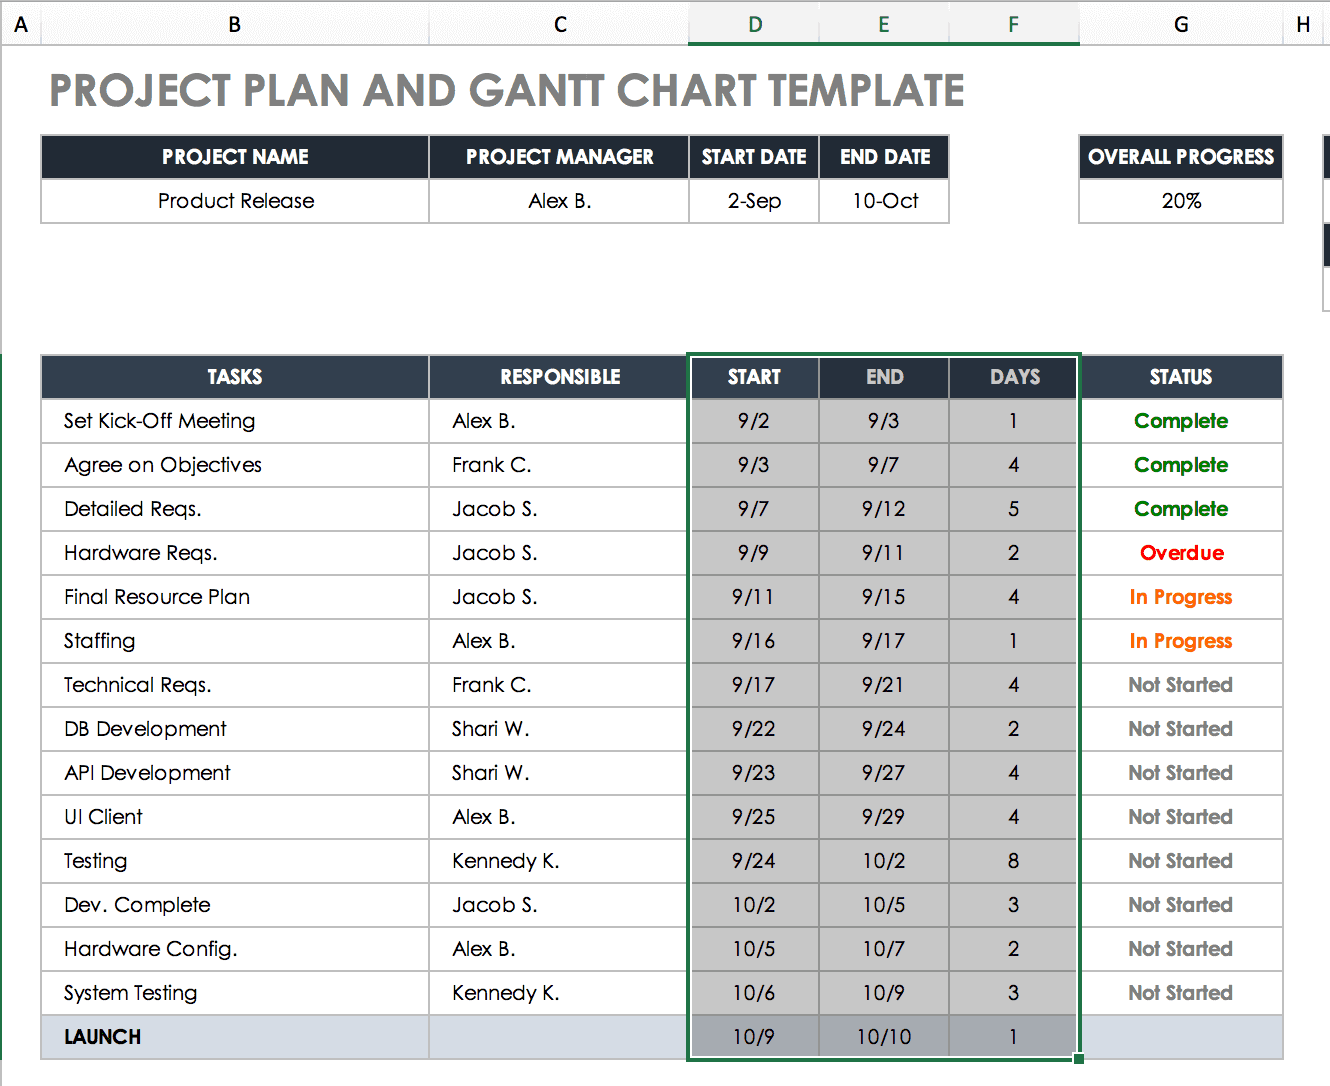
This preformatted Gantt chart template in Excel provides a simple, straightforward way to add your own project information, dates, and notes into the table, all of which will automatically appear in the Gantt chart.
To use the Gantt chart template in Excel, simply click on the download button above, and either watch the video tutorial or follow the below steps to create a unique Gantt chart for your project.
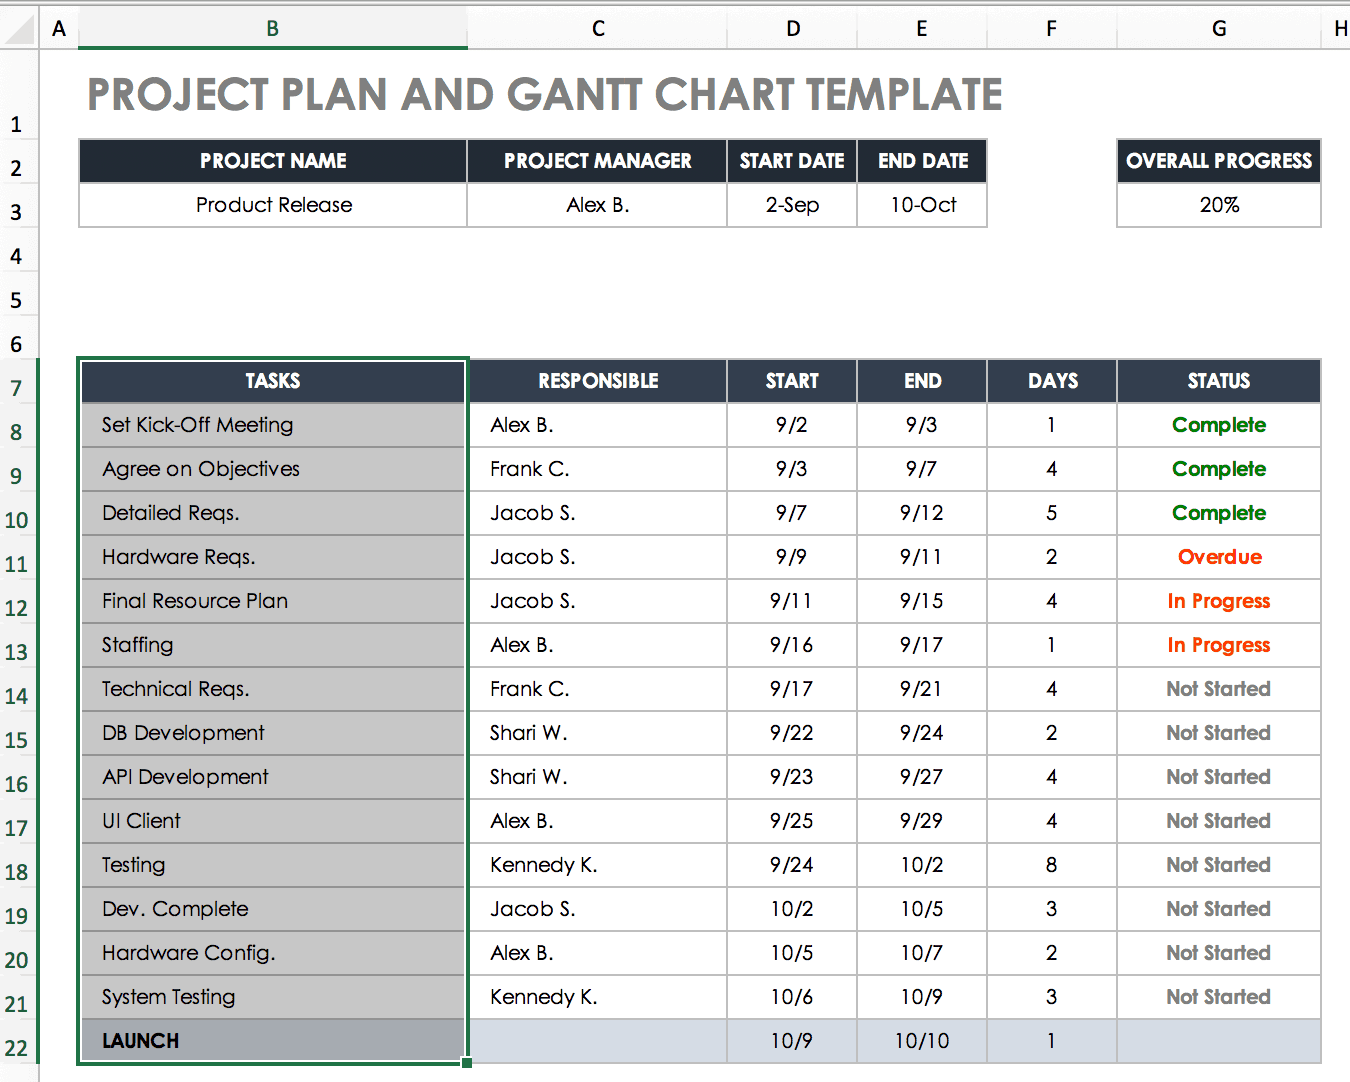
List Tasks in Your Gantt Chart Excel Template
Your tasks will make up the foundation of the Gantt chart. Break up your project into bite-sized chunks or phases, these will be your project tasks, and prioritize the tasks in the order they need to be completed.
- Download and open our Gantt Chart Excel Template for Excel 2007, 2010, or 2013.
- Add the list of tasks to the table, under the Task Name column.
- If you need to delete a row, right-click on the cell in the row you'd like to remove. Click Delete and then select Entire Row.
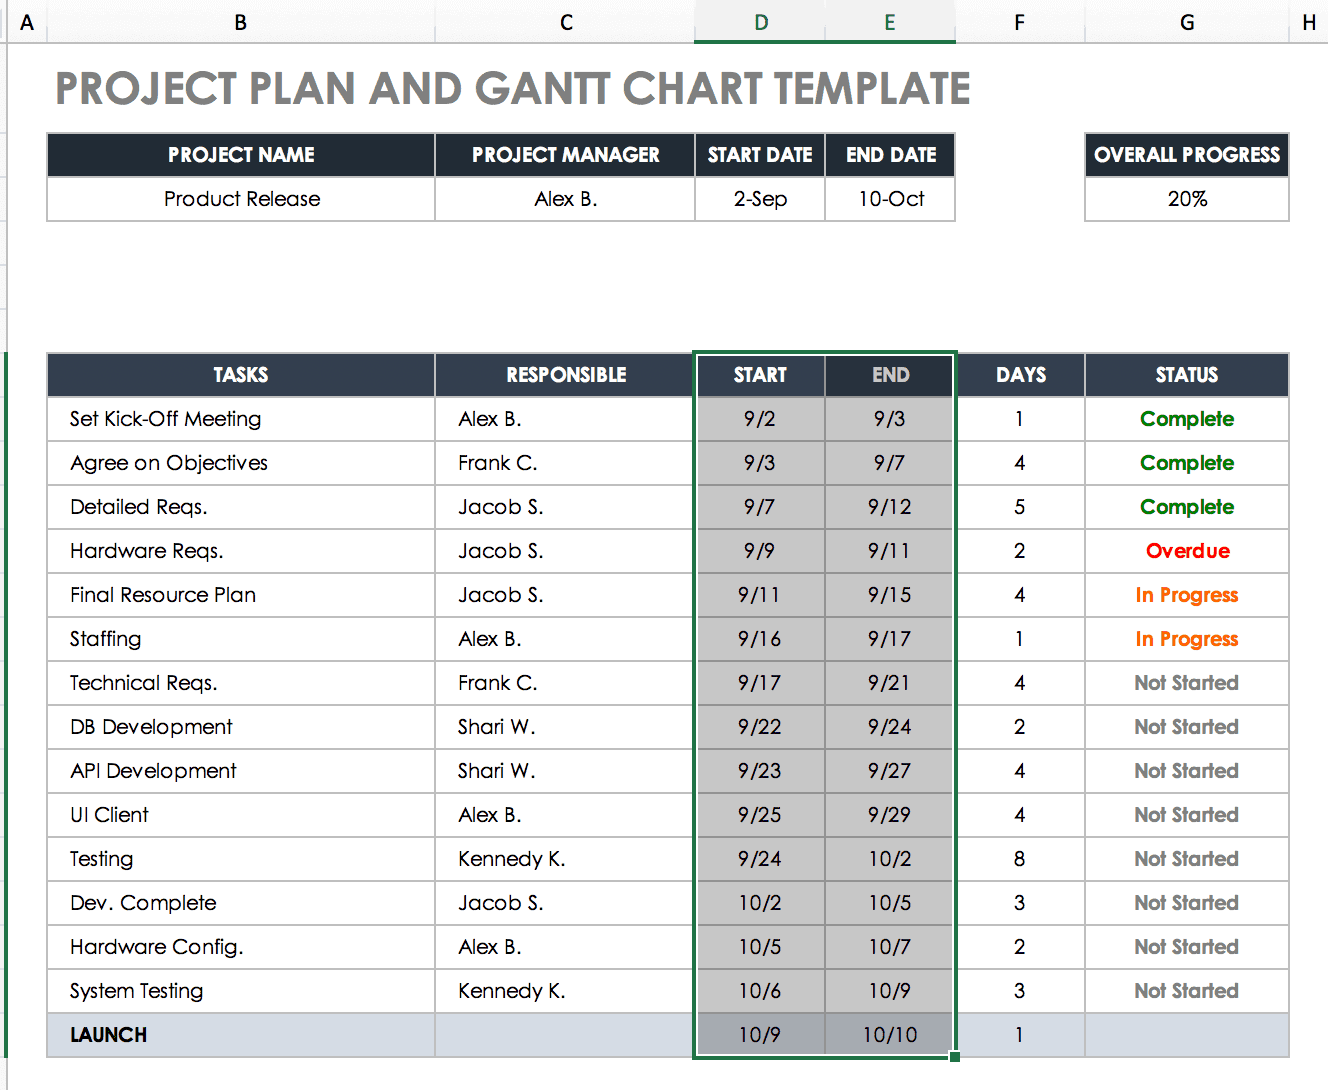
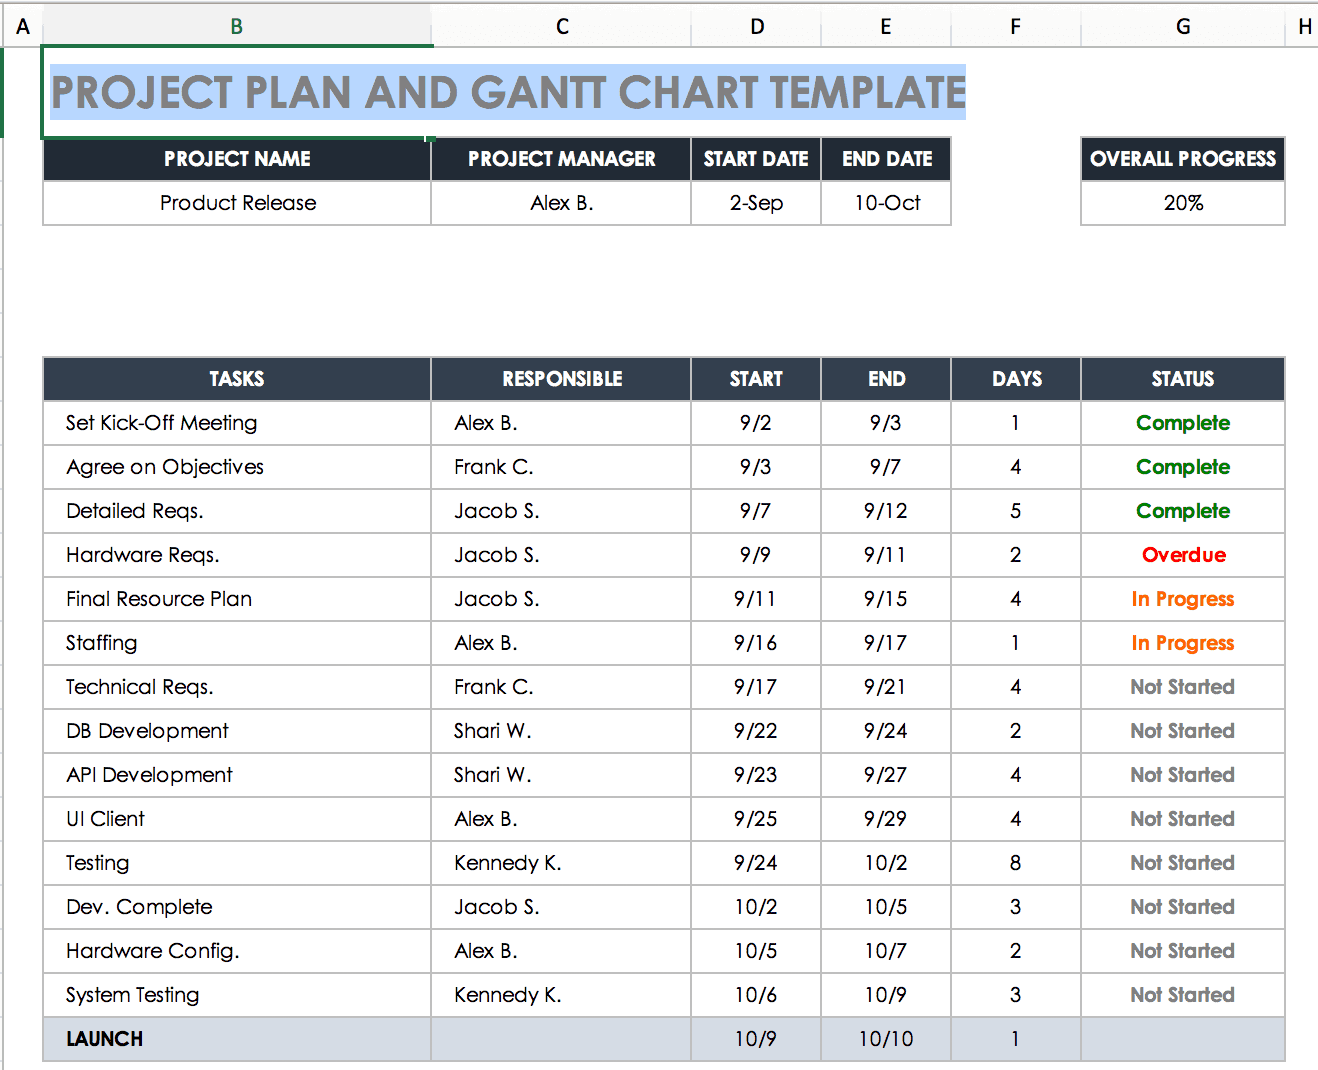
Add Start and Finish Dates to Your Project Timeline
-
Enter the date in numerical values for the month and day of each project tasks (e.g., January 16 would be entered as 1/16).
-
To change the date format, right-click on the cell with the date and select Format Cells. In the popup window, select Date, and choose the date type that suits your needs.
-
In the Start column of the table, enter the date that your task will begin.
-
In the End column of the table, enter the date that your task will be completed.
-
Continue to list all start and end dates for each task of your project.
This step enables you to visualize each task's duration, how tasks overlap, and when the project is slated to finish.
Note: As you add your dates to this table, the Gantt chart will add white space to the beginning of the chart, showing dates much earlier than the ones in your table. You can fix this in step 5 under "Customize Your Gantt Chart Excel Template."
Calculate Duration for Each Task
Based on your start and end dates, Excel will automatically calculate the duration for you with a formula.
Customize Your Gantt Chart Excel Template
After following the previous steps, your Gantt chart should now reflect the information you added to your project. You can now customize the Gantt chart to fit your project's needs and make your timeline look exactly how you want it to. Here are some customization options:
Add a Title to Your Gantt Chart
- Click on the current title,"Gantt Chart Template for Excel". A box should appear around the text.
- Click again, inside the box, and your cursor will appear.
- Delete the current title by highlighting the text and pressing Delete on your keyboard.
- Enter your new Gantt chart title.
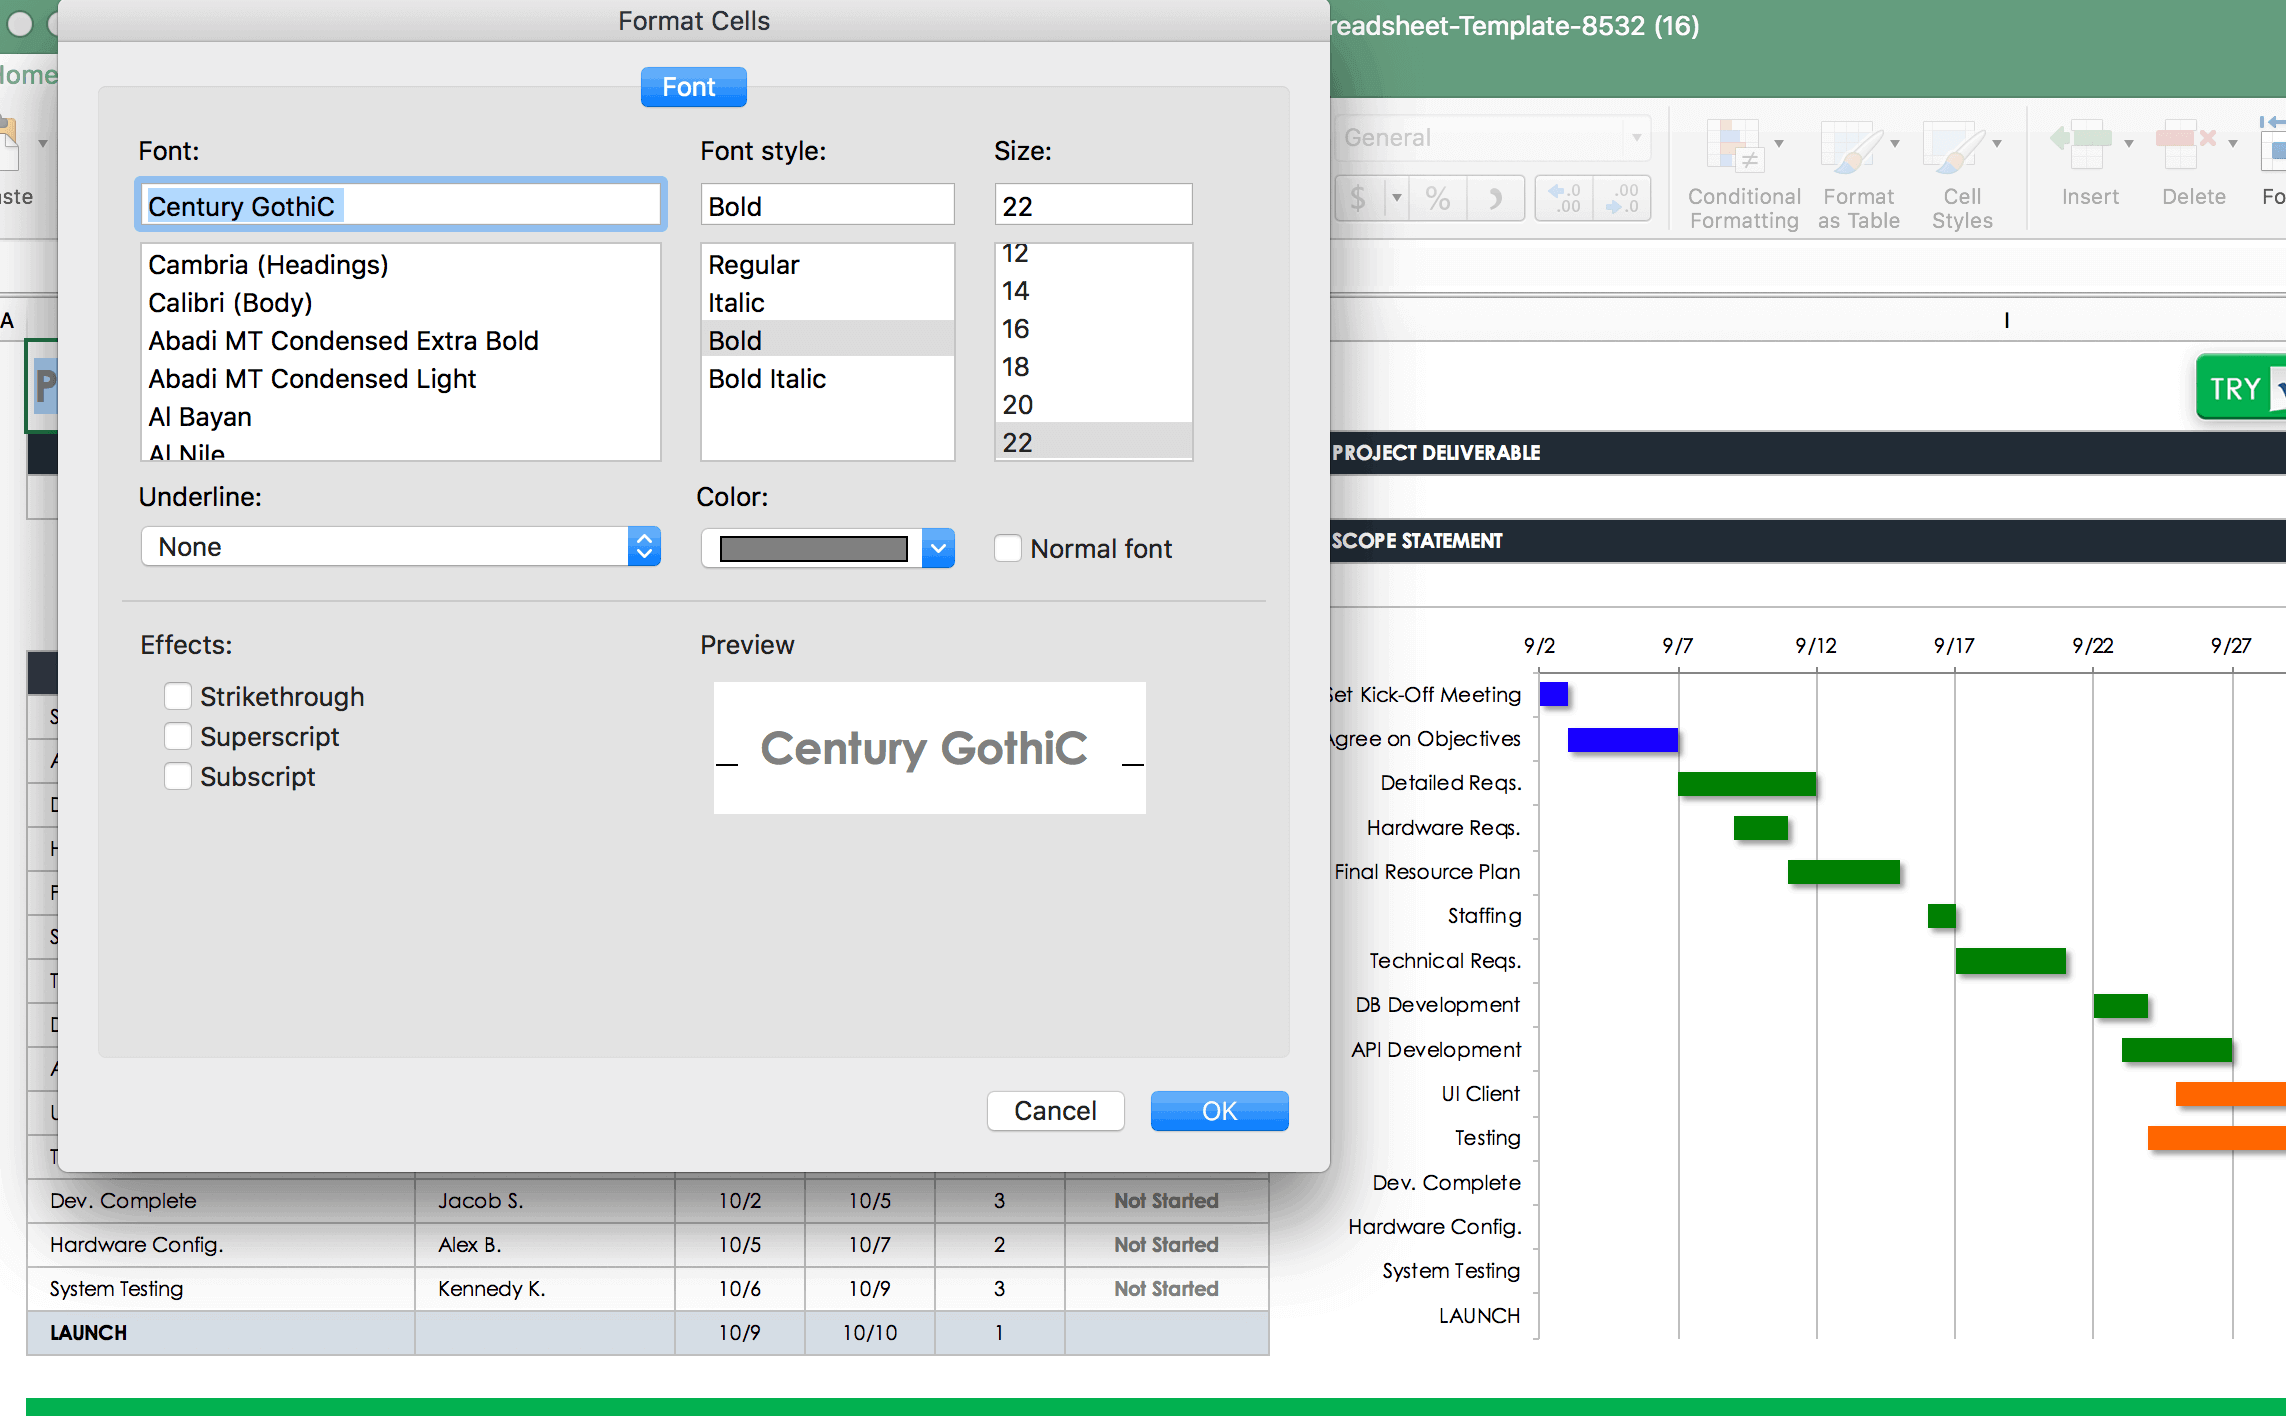
Change the Title Text and Color
- Click on the title. A box should appear around the text.
- Right click and select Font.
- In the popup window, you have the option to change the font, font style, font size, and font color.
- After making all changes to the title, select OK, and your changes will be made to the title.
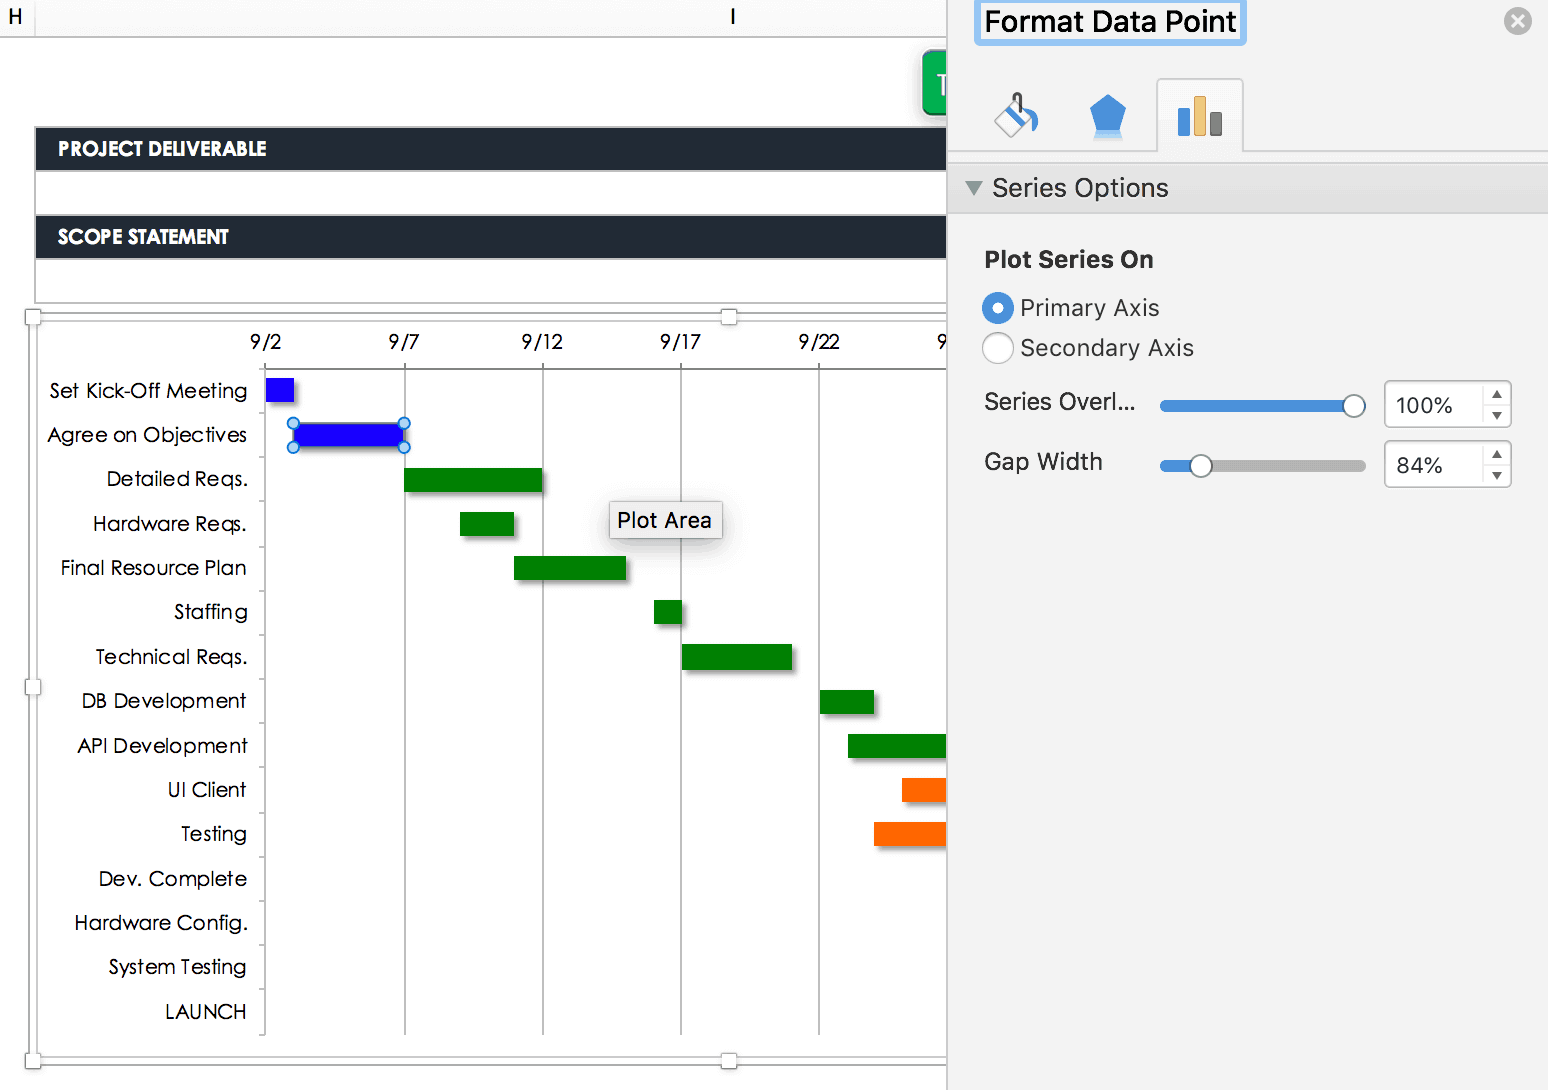
Change the Colors of the Task Bars in Your Gantt Chart
-
Double click on the task bar whose color you would like to change. Make sure the individual task bar is the only one selected, not all of the task bars.
-
Right click on the task bar and select Format Data Point.
-
In the popup window, select Fill.
-
Choose the new task bar color in the dropdown menu, and adjust the transparency of the bar, if desired.
-
Repeat these steps for the other task bars you wish to change.
By changing the colors of the task bars in your Gantt chart, you can visually organize your tasks and get a better at-a-glance view of the project and its component tasks. Additionally, you can easily divide tasks by resource, person assigned, team involved, etc.
Widen the Task Bars
-
Click on the first task bar and select Format Data Point.
-
In the popup window, choose Options.
-
Adjust the percentage in the box labeled Gap Width. The lower you set the percentage, the thicker the task bars will appear.
-
Repeat these steps for the other tasks bars you wish to change.
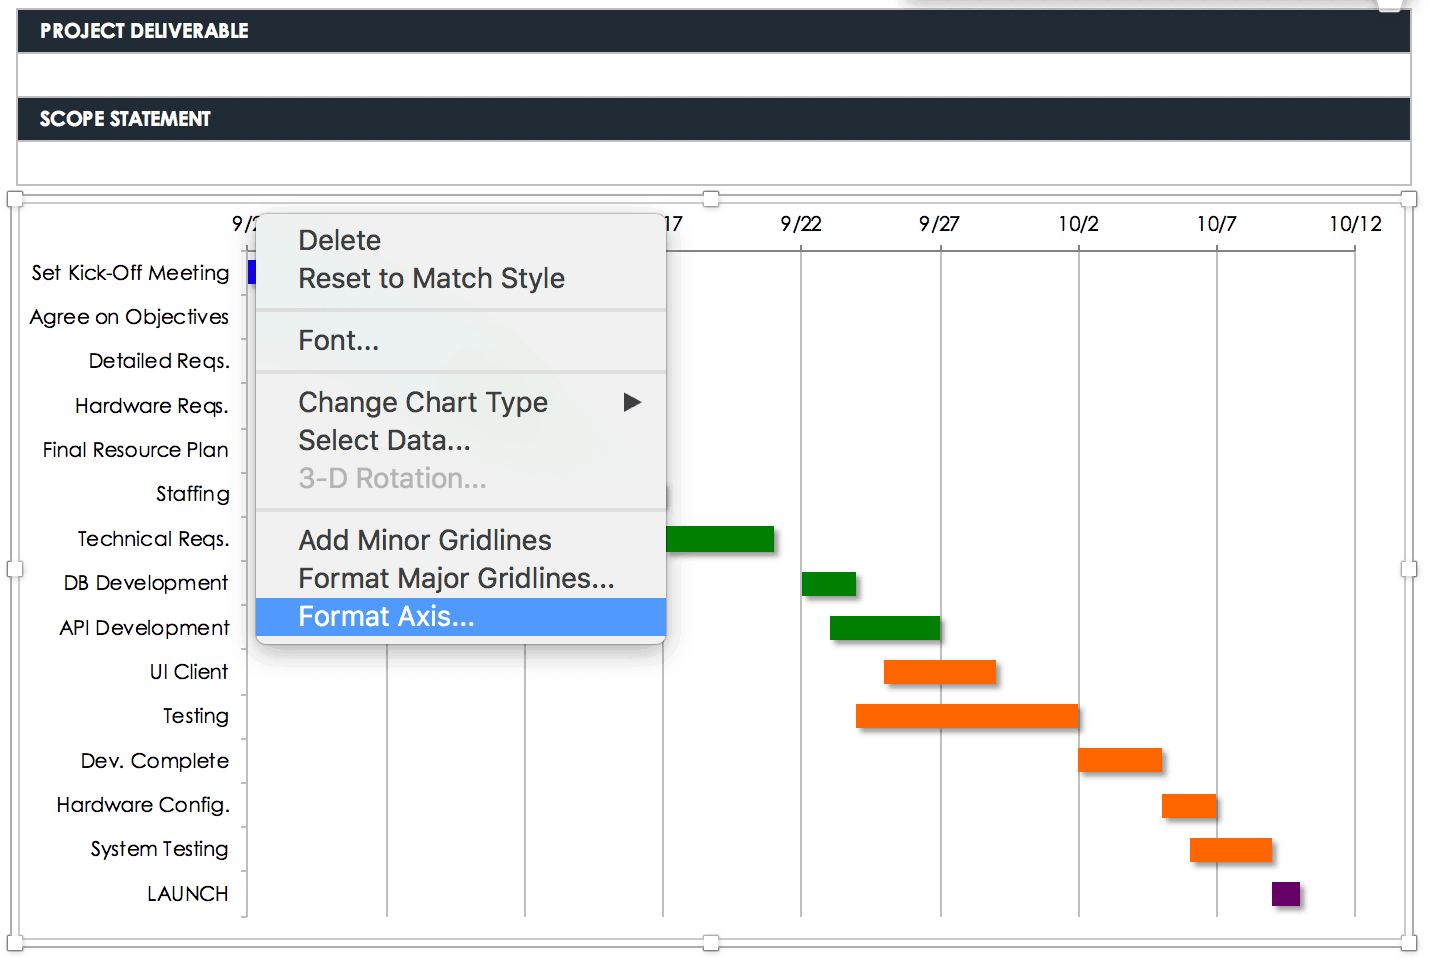
Adjust the Dates Displayed
-
Click on a date at the top of your Gantt chart. A box should appear around all the dates.
-
Right click on the box and select Format Axis.
-
In the popup window, select Scale.
-
Adjust the number in the box labeled Minimum. You will have to input numbers incrementally to adjust the spacing of the bars and get the chart to look the way you would like to.
Smartsheet
Challenges with Creating a Gantt Chart in Excel
Creating a Gantt chart with Excel can help in project planning, but there are some challenges you may face as you work to develop a visual representation of your project. These challenges include the following:
-
Requires Manual Adjustments: The chart doesn't automatically resize, making it more time consuming to manually adjust the settings for each project.
-
Unable to Label Individual Days: This can make the chart difficult to read, as many dates and longer periods of time are covered on the chart.
-
No Automated Updates to Chart Values: The values do not automatically adjust when they are updated or changed.
-
Lack of Version Control: It's hard to know whether or not you are working with the most up-to-date version of the chart because the document is static and does not reflect changes in real time.
-
Inability to Collaborate in Real Time: There is no easy way to collaborate and share the Gantt chart among team members and stakeholders, making real-time visibility and decision making challenging.
For detailed insight on what to look for when choosing the a Gantt chart software, visit Quick and Easy Gantt Chart Software, Tools, and Apps. And, if you're looking for addition Gantt chart Excel templates for a variety of use cases, visit Gantt Chart Excel Templates.
Make a Gantt Chart in Minutes With a Template in Smartsheet
Smartsheet offers a pre-formatted Gantt chart template, which makes it even easier to visualize your project and prioritize tasks. Automatically calculate duration, adjust task dates with drag-and-drop task bars, and update and share information with key stakeholders to increase visibility and improve project efficiency. Follow the steps below to create the most effective Gantt chart for your project.
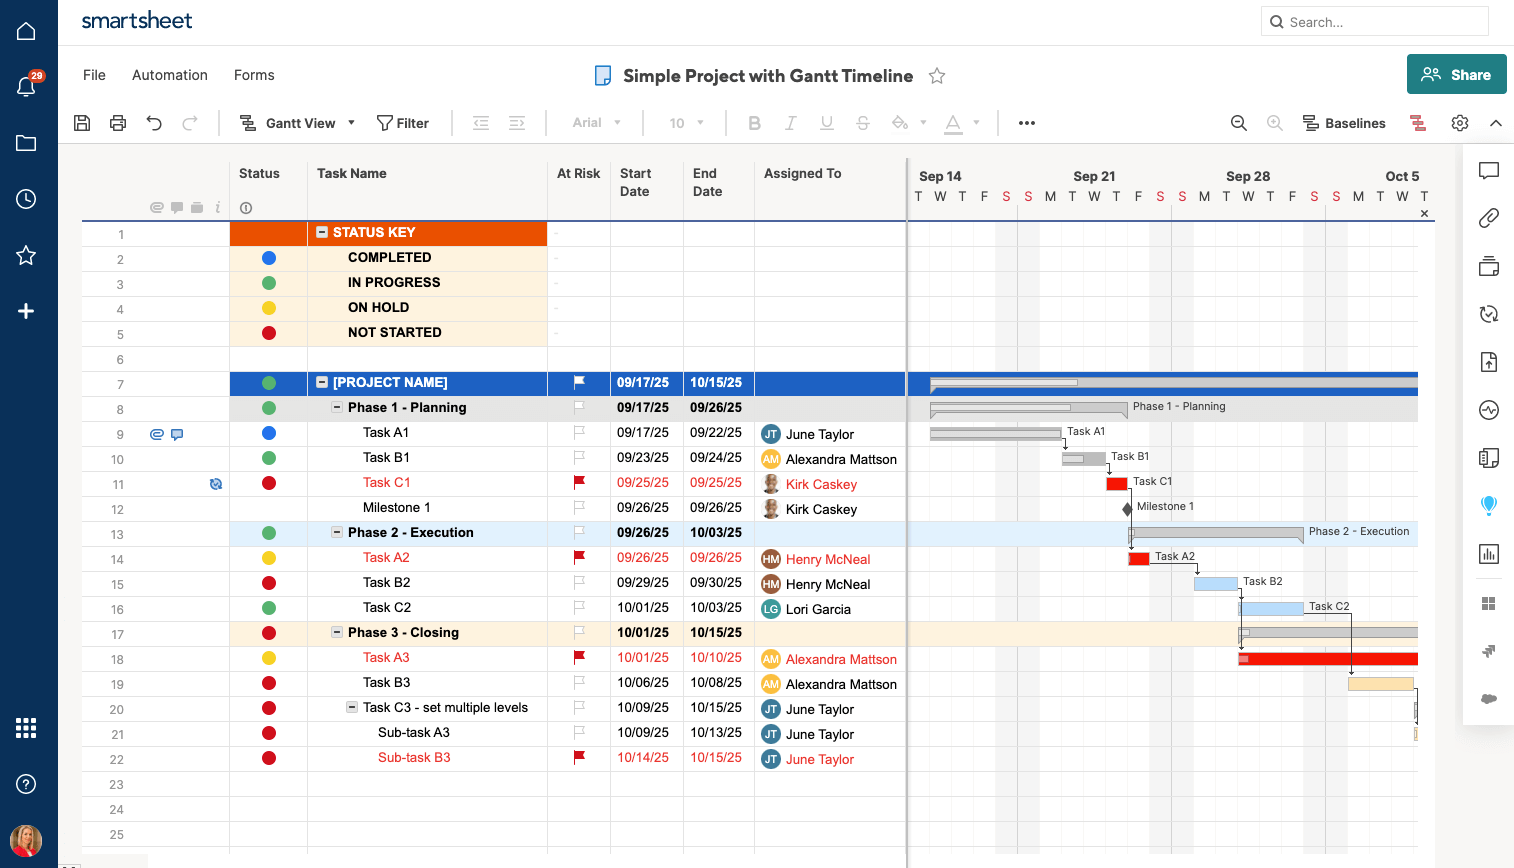
Use Gantt Chart Template in Smartsheet
List Your Task Information
-
Add your tasks within the Task Name column.
-
Establish hierarchies among your tasks to show how project subtasks roll up into larger project tasks by indenting rows. (For more information on hierarchies, click here).
-
To delete a row, right click on the cell in the row you would like to delete and select Delete Row.
-
On the left side of each row, you can find ways to add more context to your project by attaching files or leaving comments directly on the row.
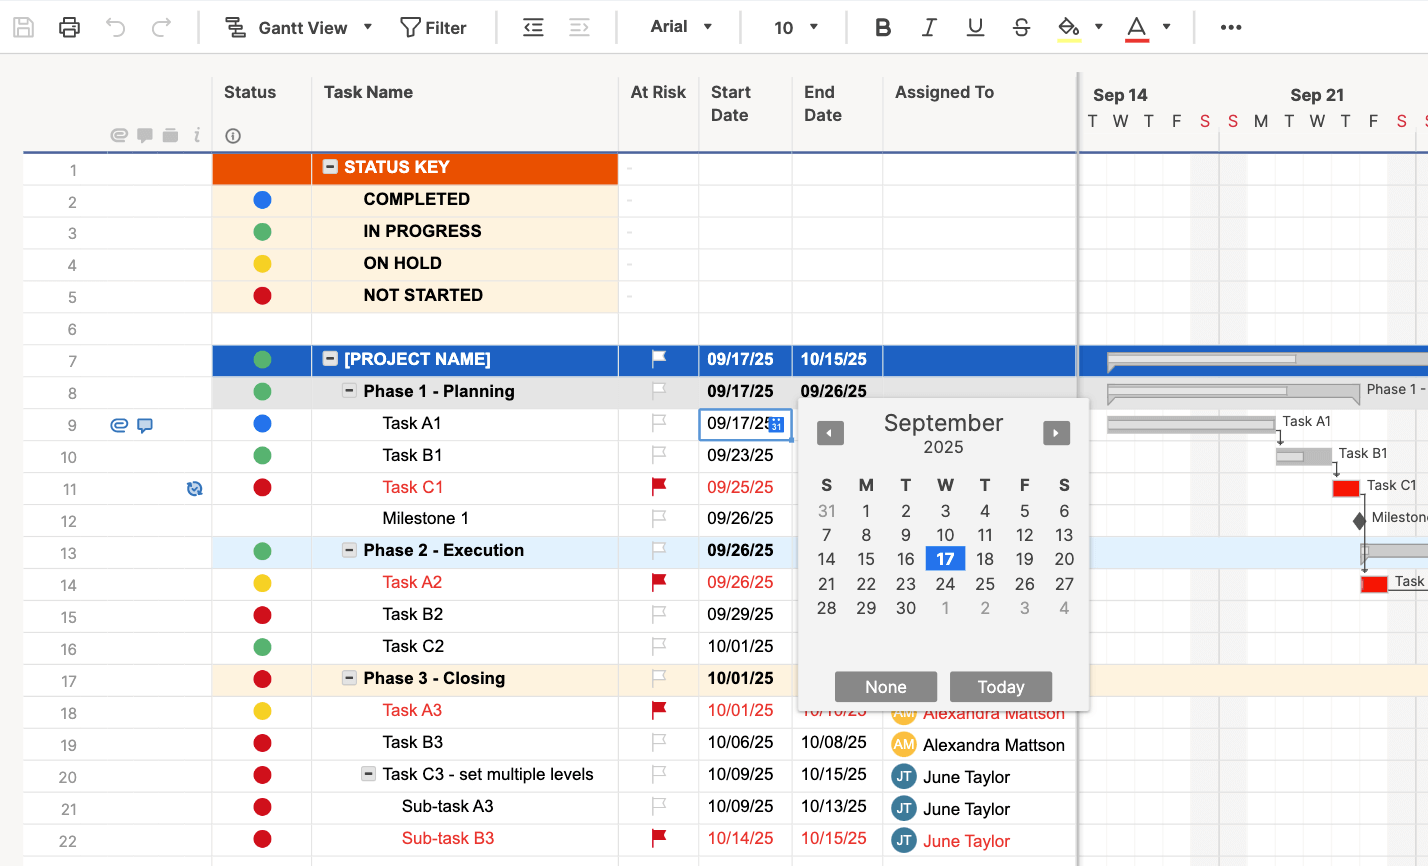
Provide Start and End Dates
-
Select a cell in either the Start Date or End Date column.
-
Click on the calendar icon and choose a date. You can also manually enter a date in the cell.
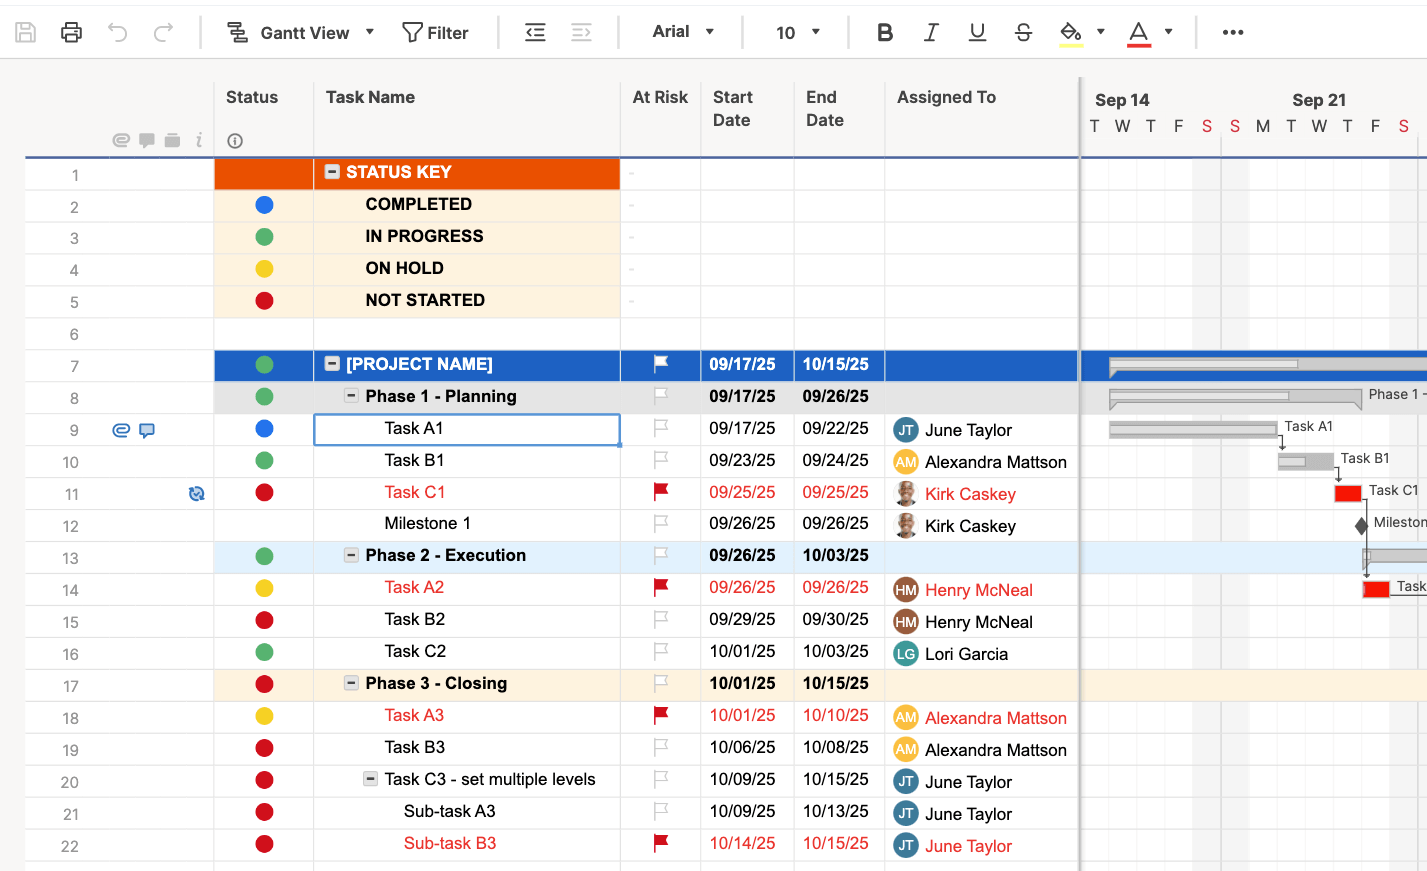
Add % Complete and Assigned To Information
-
In the % Complete column, enter the percentage of work complete for that task. Enter a whole number and Smartsheet will auto-fill the percentage sign.
-
In the Assigned To column, choose a name from the dropdown menu, or manually enter a new name into the cell.
The % Complete and Assigned To columns provide more context around your tasks, outside of the start and end dates of each. The thin grey bars inside the task bars of your Gantt chart represent the percentage of work complete for that task, which can help you determine if your project is on track. Additionally, you can assign specific tasks to a team member or stakeholder to increase overall accountability and ensure everyone is aware of their responsibilities throughout the project.
Customize Your Gantt Chart Template in Smartsheet
Not only are Gantt charts easy to build in Smartsheet, but they are just as easy to customize for your unique project needs. With just a couple of clicks, you can customize the appearance of your project timeline.
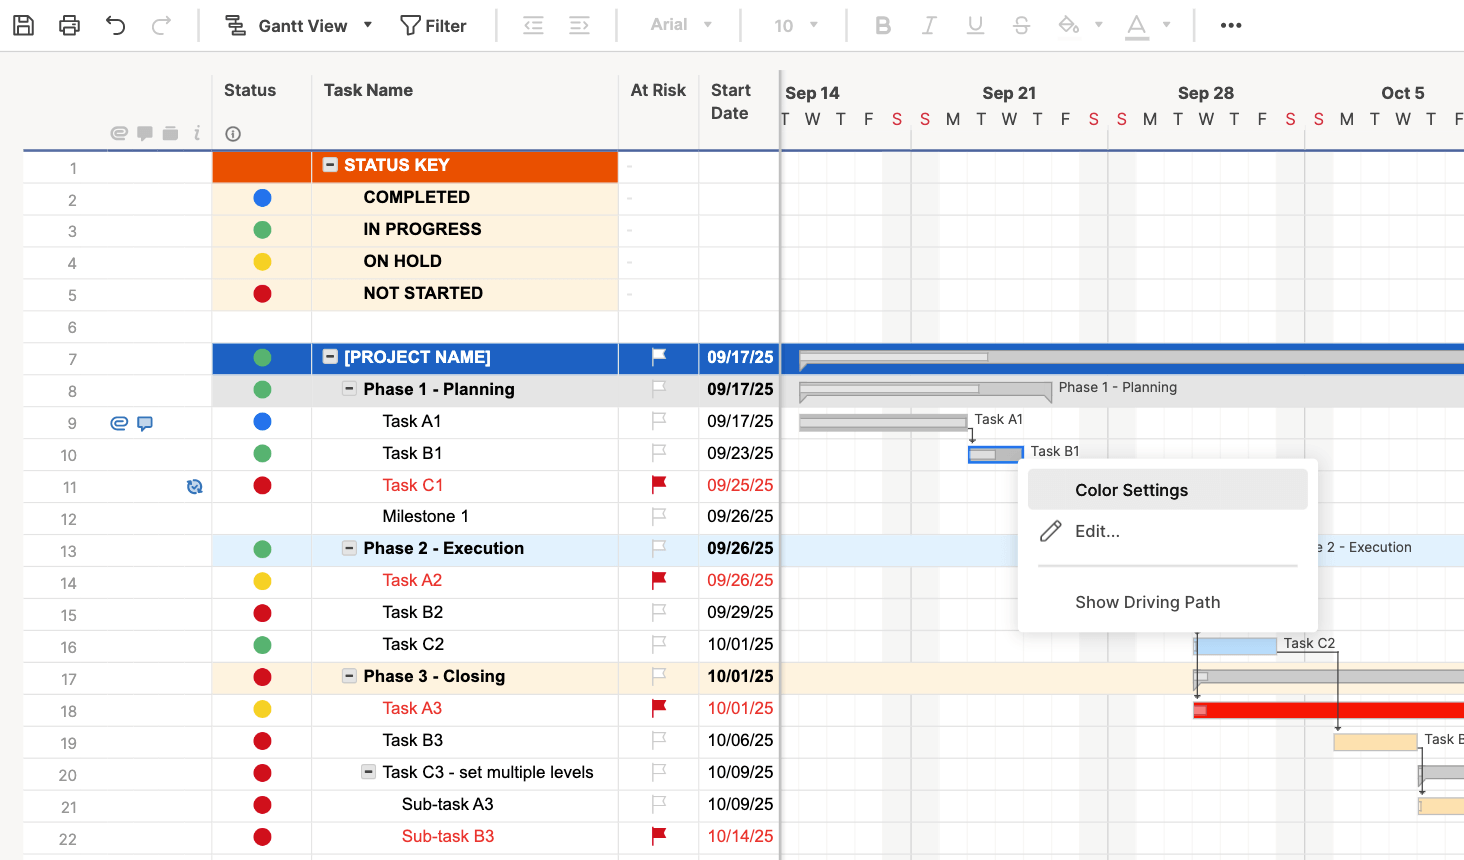
Change the Colors of the Task Bars
-
Right click on a task bar and select Color Settings.
-
A color palette will appear. Click the color you want.
-
To apply the same color to multiple task bars, select the task bars while holding down the Shift button on your keyboard. Then, release the Shift button, right click on any of the selected bars, and click Color Settings.
-
Proceed to change the color.
Import an Excel File Directly into Smartsheet
Smartsheet easily integrates Excel data directly into a template, making it easy to import any project information stored in Excel directly into Smartsheet.
-
In the upper left-hand corner of the Smartsheet interface, select the three-lined icon to open Left Panel Navigation.
-
Click on the + icon and select Import.
-
In the window on the right-hand side of the page, select Microsoft Excel.

-
In the popup window, select the Excel file you wish to import from your computer, and clickContinue.
-
AnImport Settings form appears. Here, select the row in the form that contains your column headers (which is usually the first row of the sheet) and click Import.
-
The imported file will appear as a new sheet within Smartsheet.
-
Click on the sheet name to open it and begin editing.
Turn Your Imported Excel Data Into a Gantt Chart
-
Within the top toolbar, click the Grid View dropdown caret, and select Gantt Chart from the dropdown menu.
-
A Gantt chart will automatically be created on the right side of your sheet.
-
Edit the Gantt chart as you see fit for your project.
Related Project Management Methodologies
In addition to Gantt charts, there are several other ways to manage and track a project effectively to ensure it lands on time, on budget, and within the scope of the project. Visit our Agile Methodology, Scrum Methodology, and Kanban Methodology pages to learn more about how you can manage your project by following these related methodologies.
If you're still looking for more information on Gantt charts, like who uses them, the key features, and the benefits of leveraging one in your project, visit our Guide to Gantt Charts article.
Improve Project Visibility with Real-Time Gantt Charts in Smartsheet
From simple task management and project planning to complex resource and portfolio management, Smartsheet helps you improve collaboration and increase work velocity -- empowering you to get more done.
The Smartsheet platform makes it easy to plan, capture, manage, and report on work from anywhere, helping your team be more effective and get more done. Report on key metrics and get real-time visibility into work as it happens with roll-up reports, dashboards, and automated workflows built to keep your team connected and informed.
When teams have clarity into the work getting done, there's no telling how much more they can accomplish in the same amount of time. Try Smartsheet for free, today.
Source: https://www.smartsheet.com/create-gantt-excel-template
Posted by: stefaniastefaniabarralee0306347.blogspot.com